Friday, February 28, 2014

Microwave Dhokla

This dhokla is so yummy that you wont be able to resist the urge of having more and more. Its super soft texture is incredible. I can bet you will rank it higher than a store-bought dhokla. If you like you can garnish it with chopped fresh coriander or curry leaves. Coriander definitely improves the taste of dhokla many times. Some people like it with water-boiled green chilies, some like it with green chutney, but this recipe is sufficient in itself, you don't need anything additionally.


Microwave Dhokla
I tried this recipe several times but could not get it right until i used the idli moulds to make the dhokla. Reason being: sides used to get cooked faster than the center. By the time center gets cooked, sides were over-cooked. The catch here is to use an idli mould to cook the dhokla.  Using an idli mould to cook the dhoklas in microwave made my life easier and tastier :)  Now my dhoklas are just perfect every time. Guests cant stop themselves appreciating my dhokla!!


Dhokla

Makes : 15 dhoklas

Ingredients : 

Besan (Gram flour) - 1 cup (of capacity 200 ml)
Sooji (Fine Semolina) - 1/4 cup
Citric Acid - 3/4 tsp
Sugar - 5 tsp heaped
Salt - 1 tsp
Haldi (turmeric powder) - 1/4 tsp
Water - 3/4 cup
Soda - 1/2 tsp
Oil - 1 1/2 tbsp
Rai (Mustard Seeds)- 3/4 tsp


Method :

1. Prepare a thick batter by mixing besan, sooji, citric acid, sugar, salt, haldi and water. Let it rest for at least half an hour.
2. Add soda and whisk the batter for about 1 minute. You will notice that batter has almost doubled in volume, a kind of whiteness in color of the batter and the has become very light and bubbly.
3. Grease the idli moulds with the refined oil and fill the greased cavity with 1 tbsp of batter. Make sure the cavity is filled 3/4th and not more than that.
4. Microwave one mould at a time for 1 min. (Timing depends upon the size and amount of the food to be cooked , If the dhokla is left uncooked, you will see a wet patch on the top of the dhokla, you need to  microwave it for few more seconds till it starts to leave the sides of the mould.)
5. Repeat with the remaining batter to make all the dhoklas. (Grease the mould every time you re-use it.)
6. Wait for the dhoklas to cool down completely.
7. Take a bowl full of water. Immerse a dhokla into the water and keep it on the serving plate. Do this for all the dhoklas.
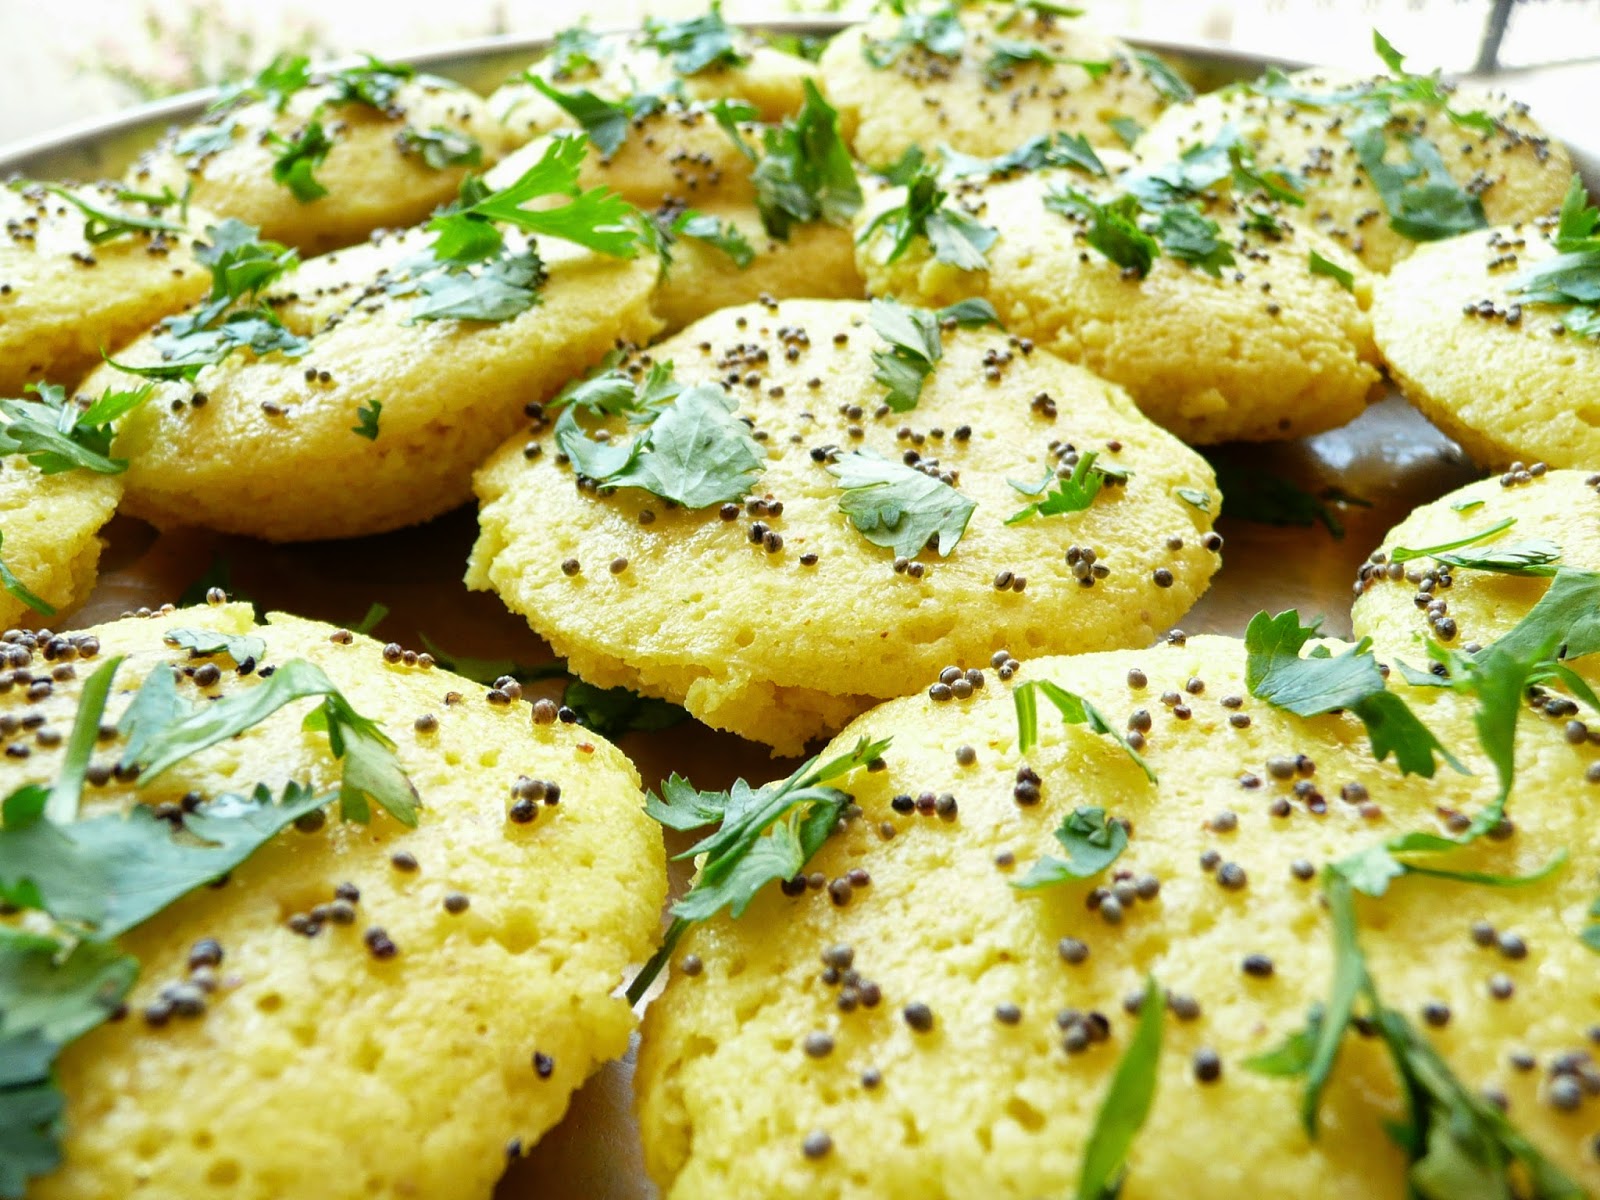
8. Prepare tempering by crackling mustard seeds in hot oil.
9. Spread the prepared tempering on all the dhoklas using a spoon.
10. Dhokla is ready to serve.

Tip : 

1. Prepare the dhokla about 1/2 an hour before the time of serving, so that, it has soaked the water up to the inner-most layer.
2. Garnish it with freshly chopped fresh coriander/curry leaves

Dhokla


Wednesday, February 19, 2014

Bharwan Mirch Ka Achar / Stuffed Jalapeno Pickle


stuffed chili pickle


This is one of the best pickle in my kitchen. This pickle goes with almost everything, be it pulav, biryani, stuff parathas, dal-roti or anything else. The good thing is - this pickle stays for years!

With this recipe you can pickle both kind of jalapenos - red and green.

Here is the recipe of this mouth-watering pickle.

Ingredients :

Bhavnagari Chilies (Jalapeno) - 400 gm
Methi dana (Fenugreek seeds) - 1 tsp
Rai (Mustard seeds) - 1 tsp
Jeera (Cumin seeds) - 1 tsp
Haldi (Turmeric powder) - 1 tsp
Salt - 4 tbsp
Amchur Powder (Dried Mango Powder) - 4 tbsp
Dhania Powder (Corriander Powder) - 2 tbsp
Saunf Powder (Aniseed Powder) - 2 tbsp
Mustard Oil - 5oo ml

Procedure :

1. Wash and towel wipe all the jalapenos.
2. Slit the jalapenos lengthways on a side from the stalk to the tip, to create an opening for the filling.
3. Dry roast methidana, rai and jeera on a griddle or microwave high for 1 minute. Let it cool.
4. Grind the above three ingredients in mixer to get a coarse powder.
5. Mix the methi-rai-jeera powder with the rest of the spices.
6. Put a little mustard oil on the masala mixture to make a thick paste (make sure its not runny.)
7. Stuff the Jalapenos and brush a little masala mixture on the outer surface too.
8. Set these stuffed jalapenos in a clean-dry air-tight ceramic/glass jar.
9. Pour the left-over masala on the jalapenos in the end and fill the jar with mustard oil floating 2" above the stuffed jalapenos (excess oil is to avoid the jalapenos from fungal attack.)
10. Set aside for two months.

Note :
1. Use gloves if you can not handle the burning sensation of jalapenos.
2. Make sure all the jalapenos are completely immersed in the oil. Not even a smallest part get exposed to air.
3. To culture the pickle faster, keep it in sunlight daily for a few hours.

bharwan mirch ka achar


Tuesday, February 18, 2014

Easy Paneer Sabji


paneer sabji


Its a low calorie preparation.
Doesn't take much time to prepare.

Ingredients :

Onions (sliced vertically)- 3 (medium size)
Capsicum (cut into long thin strips) - 2 (medium size)
Fresh Tomato puree - 4 tbsp
Paneer (cut into long thin strips) - 100 gms
Salt to taste
Corriander Powder - 1 tsp
Red Chili Powder - 1/2 tsp
Sugar - 1/2 tsp
Chat Masala - 1 tsp
Oil - 1 tbsp

Procedure :

1. Heat oil in a pan/kadai.
2. Add sliced onions and saute till translucent pink.
3. Add capsicums and cook for 2 minutes.
4. Add fresh tomato puree and  all the seasoning. Mix thoroughly on high flame.
5. Add 1 cup water. Mix. Simmer the flame for 5 minutes after a boil.
6. Add paneer and cook for 1 more minute.
7. Dish is ready to serve!

Serve it hot with chapati or paratha.

Thursday, February 13, 2014

Valentines Day Breakfast


valentines sandwich :)


Valentines Day Fried Rice


valentines day fried rice
Valentines day fried rice


This is the perfect way to serve your valentines day dinner. Prepare Vegetable Fried Rice with Manchurian and plate your Vegetable Fried Rice in the picture shown above.

The dish will itself express your feelings and excitement for the day.

Recipe :

Ingredients :

Cooked Basmati Rice : 2 cups
Onion (Chopped) - 1/2 cup
Capsicum (cut into long thin strips) - 1/2 cup
Carrots (cut into long thin strips) - 1/2 cup
Cabbage(cut into long thin strips) - 1 cup
Oil - 1 tbsp
Soy Sauce - 1 tsp
Tomato Ketcup - 1+1/2 tbsp
Chilli Sauce - 1/2 tbsp
Salt - to taste
Vinegar - 1 tsp

Procedure :

1. Heat oil in a non-stick wok.
2. Saute onion till translucent pink.
3. Add carrots, capsicum and cabbage and salt. Saute.
4. When vegetables are tender, add all the three sauces.
5. Add cooked rice and mix very well.
6. At last, add vinegar and mix thoroughly.
7. Vegetable Fried Rice is ready!

Plating :

Things Required :

1. Heart shape Baking Dish

heart shape baking dish


2.Tomato ketchup
3.Squeezy Bottle

squeezy bottle


Procedure :

Take a heart shaped baking dish. Grease it very lightly with refined oil and put the vegetable fried rice into the baking dish. Press the rice lightly with your fingertips in the baking dish. Put a plate over the baking dish. Invert the whole thing and tap the baking dish so that fried rice fall into the plate in the required heart shape.
Pour some tomato ketchup into the squeezy bottle and write something short and romantic on the fried rice :)

Tip :  Demoulded the fried rice in a microwavable plate. Prepare it well before time and reheat at the time of serving.

Tuesday, February 11, 2014

Coconut Cookies (Eggless & Wheat Flour)


Ingredients -

Wheat Flour - 1/2 cup
Powder Sugar - 1/4 cup
Desiccated Coconut - 1/4 cup
Fresh Butter (softened) - 1/4 cup
Vanilla Essence - 1/2 tsp
Milk - 1 tbsp

Procedure -

  1. Mix the butter and sugar and whisk until light and creamy.
  2. Mix the vanilla essence.
  3. Add the wheat flour and desiccated coconut to the butter-sugar mixture and prepare a very soft dough. Use milk if required. 
  4. Divide the dough into 12 round balls and shape them as desired (square or round)
  5. Place them on a baking dish keeping a distance of 1 inch apart from each other.
  6. Bake the cookies in a pre-heated oven for 15 min at 180˚C.
  7. Remove from the oven and let them cool down for 2-3 minutes.
  8. Place the cookies on a wire rack to cool down completely.
  9. Cookies are soft when taken out from the oven but get firm and crispy after cooling down.
  10. Store in an air-tight container.
Relish these cookies with tea or coffee. I like to munch-on these cookies any time of the day. I love the aroma of coconut. I love it in cookies and cakes.

Saturday, February 1, 2014

Thousand Island Veggie Hot Dog


Thousand Island Veggie Hot Dog


thousand island veggie hot dog
Thousand Island Veggie Hot Dogs

Prepare this dish for a party and be prepared to get overloaded with compliments!

A lip smacking dish!!

You can serve it as a tea-time snacks, as an accompaniment to hot soup, as a starter or as a Sunday brunch.

Beginners can make it without any hassle.

In the following recipe, I have used two products which might be new for some. To mention, first is, Thousand Island Dressing and second is Pizza Topping. Regarding Thousand Island Dressing, I used Cremica brand. It is thick, spicy and very tasty. You just need to add salt and the sufficient amount of dressing to your salads  and an exotic salad is ready in minutes. Now about the other product, i.e., Pizza Topping, I trust Funfoods. A very nice spread, enhances the taste of homemade pizzas and sandwiches many times.


Makes: 6 hot dogs

Ingredients :

Cabbage (shredded) - 3 cups
Onions (finely chopped) - 2
Tomato (finely chopped) - 2
Fresh Corriander (finely chopped) - 2 tbsp
Dry Rosemary (crushed) - 1/2 tsp
Dry Parsley - 1/2 tsp
Chili flakes - 1/4 tsp (optional)
Salt - to taste
Thousand Island Dressing - 3 tbsp
Hot Dog Breads - 6
Melted Butter / Ghee - for greasing hot dogs
Pizza Topping (ready to use) - 3 tbsp
Processed Cheese - 3 cubes
Tomato Ketcup - to garnish and serve.

Procedure :

1. In a big bowl, mix cabbage, onion, tomato, corriander, rosemary herb, dry parsley, chili flakes, salt and thousand island dressing. Chili flakes is optional because thousand island dressing is already very spicy, so if want to make your salad more spicy, you can add chili flakes, otherwise skip it.
(This salad is complete in itself and can be served as an accompaniment to lunch and dinner.)
thousand island veggie hot dog
Thousand Island salad


2. Using a knife, Cut the hot dog breads horizontally into half (but the two pieces should remain  attached to each other at the back of the hot dog bread) so that you can open it and put the stuffing.
thousand island veggie hot dog
slit the hot dog


3. Spread Pizza Topping on both the inner sides of the slit hot dog breads.

spread pizza topping


4. Divide the prepared salad into six portions and fill each portion into the hot dog breads.

fill the salad into hot dog breads


5. Grate a little cheese over the stuffing using the finest grater. If you are calorie conscious, you can skip this step.

hot dog with cheese


6. Brush melted butter or ghee all over the outer surface of hot dog breads and bake it for 4 minutes at 250 degrees in a preheated oven on a low rack. Cheese should melt down and breads should turn red and crispy on the top and sides. Bake a little more if the cheese has not melted.

hot dog after baking


7. Garnish the baked hot dogs with tomato ketchup in a zigzag pattern using a squeezy bottle and serve them immedietly.

thousand island veggie hot dog
Hot dogs ready to serve!


Friends, if you try this recipe, please comment about how your ones turned out.